Most people only give a little thought to their water heater once it fails. Cold showers, dirty dishes, and a lack of laundry can cause a major disruption to your family’s lifestyle.
It is important to have a professional handle routine water heater maintenance and repair to avoid serious problems down the road. A professional can also recommend a preventative maintenance schedule for you to follow, visit Denver Water Heater Repair to proceed.
The thermostat is a key component that keeps track of the average temperature in the house, and it communicates this information to the heating element to keep your home comfortable. However, it won’t signal the heating element to heat the water if it doesn’t work correctly. Inconsistent water temperatures are another common sign that the thermostat is malfunctioning. If your water is scalding hot one moment and lukewarm the next, this could indicate a malfunctioning thermostat or a broken heating element.
Ensure electricity is delivered to troubleshoot a thermostat that’s not working properly. Check the circuit breaker in your service panel to see if it has tripped, and reset it by rocking it to the OFF position and then back to ON. You should also check the fuse for the water heater to ensure it hasn’t blown and replace it if necessary.
If you still have no power to the thermostat, it’s likely a sign that the high-temperature cutoff switch is bad. In this case, you’ll need to call an electric water heater repair person to fix the problem. It would be best if you also looked for a red reset button inside the access panel on your water heater. Push this button to reset the unit.
Thermostats have a graduated dial that shows letters, such as A and B, or a number, such as Fahrenheit, to show the desired temperature. They can also have a display that shows the current temperature, in which case you’ll want to change it manually by turning the dial to the desired setting.
A thermostat’s location in your home is important, too. It should be located away from drafty areas and sunlight, where it can get a more accurate reading of the average temperature. It should also be at least 6 inches above the floor and away from flammable materials, such as curtains or carpets.
When you’re ready to restore the gas supply to your water heater, ensure all open flames and appliances are completely out of the area. You should also wear gloves and eye protection when handling the natural gas line to ensure safety and avoid leaks.
If you run out of hot water or your electric tank is heating less efficiently, it may be time for an element repair. The good news is that, in most cases, the problem can be solved with simple DIY troubleshooting techniques.
First, turn off your circuit breaker and disconnect the power cable from the tank. This step is critical since working on gas and electric tanks involves a lot of pressure and temperature and can be dangerous if not handled correctly. A professional plumber will have the proper tools and safety protocols to manage these conditions.
When ready to begin, use your voltmeter or resistance meter to test the lower and upper thermostats for electrical continuity. If the meter indicates that it’s receiving line voltage (which in this case is 208 volts), it is likely that either one or both of the heating elements are broken and need to be replaced.
Next, try to reset the temp switch by pressing the red or black button located directly above the thermostat with a screwdriver or pencil GENTLY. A mechanical “click” should be felt or heard if it is tripped. If this doesn’t work, your problem is more serious, and a professional must be called in to perform further diagnostics.
Plenty of hot water is essential for many things, from showering to washing dishes and cleaning our homes. But it’s also important to protect your water heater from malfunctions, which often involve the dip tube. When a dip tube cracks, cold water sneaks into the tank and mixes with the hot water supply. This leads to lukewarm water or, at the very worst, completely cold water. Luckily, dip tubes are fairly inexpensive and easy to replace.
The dip tube is a small pipe that sticks up from the top of your water heater tank and draws in cold water to prevent sediment buildup inside the tank. It’s also designed to push the cold water towards the bottom of the tank near a burner, where it can be heated so that hot water rises to the surface for use. It’s common for a dip tube to rust or break over time.
Most manufacturers make dip tubes from non-metallic materials to prevent them from interfering with the sacrificial anode on the bottom of your water heater tank. These tubes are also curved to swirl the water in the tank, reducing sediment buildup.
While most dip tubes are plastic, some water heaters feature metal ones. If the metal dip tube rusts, it may leak into the tank and cause serious problems.
Fortunately, the repair process for a broken dip tube is relatively simple and can be done by any homeowner with basic tools, including a flat screwdriver. First, shut off the power to your water heater at the circuit breaker and close the cold-water inlet valve. Next, drain the tank to remove any plastic dots, and then disconnect the dip tube from its inlet port by turning the nipple and connector counterclockwise.
You can buy a replacement dip tube at your local hardware store or home improvement center. Choose tubing made from cross-link polyethylene or PEX, which resists corrosion and can withstand high temperatures inside the tank. It’s also a good idea to use a long tube cut at the proper length so that it reaches below the lower element but is off the bottom of the tank.
The pressure valve on the top or side of the tank is designed to open to safely discharge water if the temperature or pressure rises above a preset threshold. If the valve fails to function properly, it can trigger a dangerous water heater explosion.
This safety feature is important if you live in an apartment or have neighbors who use the same hot water supply because it protects you from their overuse of your hot water system. If the water pressure in your home is low, it may be due to a physical restriction in your pipes, or they may be clogged with mineral deposits. This is a problem that requires professional plumbing services to resolve.
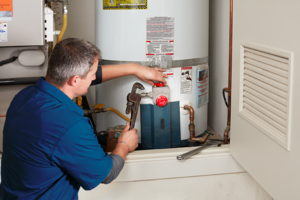
The gas valve control on the side of your water heater is another crucial part of your appliance’s safety and proper functioning. This red knob is a vital link between the inflow of natural gas into the unit and the outflow through the main burner assembly. If the valve isn’t relighting or is leaking, it can cause serious fires and other issues with your water heater.
Before attempting to make gas water heater repairs, it’s essential to turn off the water and power to your unit and shut off the gas line at your house. Ideally, you should do this before beginning any work on your tank, but if the problem persists, it’s best to call a professional immediately.
Typically, gas water heaters are located in the garage or basement of your home, and they can be very dangerous to handle without proper training. If you need to know where the gas valve is, consult the owner’s manual for your specific model. The gas line disconnect is a precise procedure and should only be performed by someone with the necessary training and experience. If you smell natural gas in the area before or during this process, evacuate and call the gas utility company immediately.
Once the gas valve is turned off, testing that all other components are working correctly is important. To do this, turn on a faucet in your home and run the water for several minutes. If the faucet has consistent hot water, this is a good indication that you successfully restored functionality to the thermostat and pressure valve.