Home » Home Improvement
Category Archives: Home Improvement
Becoming a General Contractor
General Contractors Richmond VA takes the design and concept created by an architect or design team and makes it a reality. They work with the contract owner to create a budget and schedule, and they will also hire all subcontractors and specialized tradespeople to do the actual construction work.
Before hiring a GC, check Levelset’s Payment Profiles to learn how quickly they pay their vendors and if they communicate well with accounting. This could save you money and stress on your project.

The responsibilities of a general contractor are broad, but they generally include managing construction sites, monitoring project progress and ensuring legal compliance. Additionally, they may be required to prepare and submit construction proposals to potential clients. This is an important part of the job because it enables them to gauge whether their bids are competitive and ensures that they are on track to meet deadlines.
It is also a general contractor’s job to communicate with all parties involved in a project, including architects, engineers and designers. They may also be responsible for negotiating with subcontractors and managing their schedules. Additionally, they must ensure that all building supplies are delivered on time and that the quality of those materials meets the client’s expectations.
General contractors are required to have a good understanding of local building codes and ordinances, especially those related to large civil construction projects. Having this knowledge helps them to navigate complex regulations and prevent costly fines or penalties.
Since there are so many different people working on a construction site, it’s easy for things to get overlooked or misinterpreted. A general contractor serves as the point person for all issues on a construction site, preventing confusion and ensuring that everything is completed correctly. This can save a significant amount of money in the long run, as any errors that occur during the construction process are caught and corrected early on.
A general contractor must also be familiar with various building methodologies and technologies to help them find the most cost-effective solutions for a construction project. This includes utilizing green building practices, maximizing space usage and minimizing waste. They may also be responsible for obtaining any necessary permits or licenses, as well as securing construction insurance.
Finally, general contractors must also be familiar with the various warranties or guarantees associated with construction supplies and equipment. This ensures that they are using the right materials in the best way possible, ensuring that they receive the most value from their investment. They must also be able to maintain products’ warranties by properly installing them and caring for them according to the manufacturer’s instructions.
Education and Training Requirements
Becoming a general contractor isn’t impossible but it does require a number of education and training requirements. Whether it’s through vocational school, an apprenticeship or even a bachelor’s degree in construction management, you will need to invest both time and money into your education and training as a GC.
Unlike a specialty contractor, general contractors perform many different jobs throughout the building process, so it’s important that you choose an educational program that will help you prepare for all aspects of construction. Some programs offer specific courses in topics like project management, cost estimation and construction law while others include field work and internships for hands-on experience. Some even provide certifications you can use to meet licensure requirements for specific job sites or projects.
You will also need to have a strong foundation in your industry knowledge, including building codes, inspection procedures and safety standards. In addition, excellent organizational skills are a must, as you will be overseeing multiple moving parts at once. This includes monitoring the progress of individual subcontractors and reviewing daily reports to assess jobsite conditions. It’s also critical to communicate effectively with everyone on site.
Licensing requirements vary by state, so make sure you check with your local government offices for the specifics. Requires a license for residential general contractors, which is obtained through the Department of Consumer Affairs by passing an exam and providing a variety of documents like business registration certificates, insurance policies and utility bills. Depending on your location, you may also need to be licensed at the county or local level for some types of construction, such as well-drilling or plumbing.
Regardless of the licensing requirements in your area, you will need to acquire construction equipment to complete your work. BigRentz offers a national network of rental locations, making it easy to find the right equipment for your project. In addition to our wide selection, we offer a range of financing options to help you manage your budget and stay on schedule. Our customer service team is also on hand to answer any questions you might have.
Licensing Requirements
Becoming a general contractor requires a combination of education and hands-on work experience. A GC typically begins his or her career by mastering a particular trade, such as carpentry or plumbing. This often takes years of training courses and supervised work, often through apprenticeships sponsored by unions or professional organizations. The GC then passes trade, law and business exams before receiving a license from the state. The GC is also required to carry certain insurance policies, such as professional liability and surety bonds.
Managing large construction projects involves the movement of massive amounts of materials and personnel. It is the responsibility of the GC to hire a team of professionals with expertise in supply chain management and logistics to ensure that all items are available at the right time to meet construction schedules and budgets.
The GC is also responsible for acquiring all necessary building permits and scheduling city inspections to make sure that construction meets local codes. This is particularly important for commercial projects, where the GC may be responsible for getting multiple contractors to submit their work for inspection.
A GC must be able to resolve disputes and maintain discipline among construction workers. This is especially true when the work on a project goes over budget or there are other issues that can cause a delay in production. The GC is also required to supervise and control the site to prevent accidents or damage caused by subcontractors, which could cost the owner more money than anticipated.
Many states require a GC to be licensed before he or she can contract for construction work. The licensing process usually includes passing an exam and providing documentation of professional qualifications, including insurance, tax records and a valid business certificate. Obtaining a license is an essential part of the job, since property owners tend to prefer working with licensed contractors. Having a license also allows a GC to protect his or her lien rights in many states, which is critical for making sure that everyone who works on a construction project gets paid for their services.
Salary
The amount of money a general contractor makes will vary based on several factors, including the state in which they work and the size and scope of the construction projects they take on. In general, states with large populations and high levels of economic activity tend to pay the highest salaries for this occupation. Likewise, the cities within these states often have higher wage rates than their surrounding rural areas.
In addition, the experience level of a general contractor will also have an impact on their salary. For example, contractors with years of field experience are generally able to manage larger construction projects more efficiently than their less-experienced counterparts. As a result, they are able to charge higher hourly rates for their services.
General contractors are in charge of coordinating all aspects of a construction project, from beginning to end. They typically oversee the work of many different tradespeople, making sure that the project is on budget and meets all local building codes and regulations. Additionally, GCs must coordinate with engineers and architects to ensure that the finished product will be functional as well as safe.
Most GCs work for construction companies, though some are self-employed and may operate a small construction business on their own. In either case, they must be able to manage their own finances and keep track of the numerous details involved in construction projects. Additionally, they must be able to make decisions and act quickly. For these reasons, GCs are often on call 24 hours a day to respond to any emergencies or issues that may arise on the construction site.
Many GCs start out in a related trade like masonry, carpentry or another skilled trade before becoming a general contractor. Some also pursue industry-recognized certifications to boost their resumes and market themselves as experts in their fields. Finally, many GCs begin their careers with an apprenticeship, which will provide them with hands-on training and the opportunity to earn while learning on the job.
For those interested in becoming a GC, the career path is fairly straightforward. There are no particular educational requirements, and most GCs gain their first experience by taking on small side jobs or working for family members in the construction industry. If they are successful, these jobs can lead to more opportunities and higher wages in the future.
Cabinet Refinishing – Revamp Your Kitchen Without Breaking the Bank
San Jose Cabinet Refinishing is a great way to revamp your kitchen without breaking the bank. It also solves a common issue with solid wood doors that warp over time due to “breathing” caused by changes in temperature and humidity.

Refinishing is changing your cabinets’ appearance by painting or staining them. It only changes the color or finish of your cabinets and leaves everything else intact.
Cabinet refacing and cabinet painting are both viable options for those looking to change the look of their kitchen cabinets without replacing them. The cost for both projects can vary, however, so it’s important to know what you’re getting into before deciding to go with one or the other. During the refacing process, your cabinets are completely covered with overlays to give them a new look. This includes the door fronts, boxes, and gable ends. They’re also refinished and painted to match the rest of your kitchen.
Cabinet painting is a less expensive option than refacing but can still be costly. It requires a lot of preparation and time to get the results you want. For instance, the surfaces need to be thoroughly cleaned before being primed. It’s best to use a degreaser, which can be bought at hardware stores. This will remove grease and oil that can prevent the paint from adhering to the surface. It’s also a good idea to wear a mask when spraying and to open windows for ventilation.
If you’re not a fan of spraying, you can use a brush instead. But be sure to tape off any areas where you don’t want paint to get on them. Before you begin painting, sand down the surfaces with 220-grit sandpaper and a foam sanding block. Be careful not to sand down to the wood but only enough to roughen the surface and give the primer something to adhere to.
It’s also a good idea to apply several coats of primer. This will help your finish last longer and protect the surface from water damage, which can cause it to chip. If you’re working with old wood, you may need to sand again between coatings. If you’re using a water-based stain, you may need to add a little bit of mineral spirits to the mix to keep it from drying too quickly and creating streaks.
Another thing to consider when choosing a cabinet refinishing company is their reputation. If they have a poor track record, you could end up with damaged or chipped cabinets that will require repairs. It’s worth paying a little extra for a reputable company.
Time
Cabinets are a mainstay in most kitchens, but they can become outdated over time. Fortunately, there are many ways to update them without breaking the bank. One way is to refinish them. Refinishing is a process of changing the color of the cabinets, usually by staining or painting. It is a cheaper alternative to replacing them, and it can be done in less time.
Refinishing your cabinets involves cleaning and sanding the surface to prep it for paint or stain. It is important to sand the entire area, including the edges. Afterwards, the surface will receive at least two coats of primer and then paint or stain. It is also a good idea to lightly sand the surface between each coat. This will help create a smooth, durable finish that will last for years.
NHance’s professional refinishers can give your cabinets a high-end designer look that will last for years to come. Unlike most paint products, our stains are made to stand up to repeated touching and exposure to moisture, grease, and other contaminants. This is especially important for a kitchen environment where the cabinets are in constant contact with hands and fingers.
While refinishing is the most common way to change your cabinet’s appearance, there are other options available. Cabinet refacing and cabinet resurfacing are similar, but they differ in the way they change your cabinet’s appearance. Cabinet refacing involves changing the door and drawer fronts, while cabinet resurfacing changes everything else about the cabinet’s exterior.
If you’re considering a complete overhaul of your kitchen, cabinet refacing is the way to go. It takes longer than refinishing, but it provides a completely new look for your cabinetry.
Cabinet refacing is a great option for homes with existing wood cabinets. However, it is not a good solution for cabinets that are badly damaged or dated. Refacing your cabinets will require removing the doors and drawer fronts, as well as re-hanging them. It can take a few days to complete the project. During this time, it’s important to cover and protect other surfaces in the kitchen to avoid dust.
Materials
Cabinet refinishing requires the right materials to make your cabinets look new again. There are several types of finish, including painting, staining, and glazing. Each type has its own advantages and disadvantages, but they all offer the same result: a fresh, updated look. The best quality finish will last longer and resist fading better than the cheaper options. The material you choose will also affect the overall cost of the project. For example, oil-based finishes are more expensive than water-based finishes, but they have a much higher durability.
You should always check a company’s references before hiring them to work on your cabinets. This will help you find out how well they’ve done past projects and if they meet your expectations. You should also ask the company to provide a free quote for your cabinet refinishing. This will give you an idea of how much your project will cost and what to expect from them.
A good cabinet refinishing company will have high-quality paints and varnishes for the job. They’ll also use proper prep tools and techniques to ensure a smooth surface. For example, they’ll strip the old paint off the doors and drawer fronts with a chemical remover or hand sanding before applying the new color. They’ll also use a gel formula that’s biodegradable and non-corrosive, which will leave the wood in excellent condition.
When choosing the color for your cabinets, consider the overall style of your home. The best choice is a neutral color that matches your appliances and other home furnishings. It will also look more modern and timeless than a bold or bright shade. Also, a light color will be easier to clean and maintain than a dark one.
Another important factor is the type of material your cabinets are made of. Solid wood is easy to refinish, but the process takes more time and effort when you’re working with laminate or other materials. If you’re refinishing your cabinets and are unable to change the style of the door profiles, you may want to consider refacing them instead.
If you’re planning to refinish your cabinets, be prepared for a big undertaking. You’ll need a large area for the project, and you’ll need to wear protective equipment such as face masks, safety glasses, and gloves. You’ll also need dropcloths and plastic sheeting to protect the areas surrounding your cabinets. It’s a good idea to label Ziploc bags with permanent marker, so you can easily find the hardware that goes with each cabinet when it’s finished.
Expertise
Cabinet refinishing is a complex process that requires skill and experience. A professional can do the job quickly and efficiently, saving you time and money. They will also use high-quality products that produce a superior look and will stand up to the test of time. When choosing a refinishing company, make sure they have the proper credentials and insurance coverage. In addition, ask for references and samples of their work. If they are unwilling to provide these, it is likely that they are not a good choice.
Before the cabinet refinishing begins, it is important to clean the cabinets to remove any dust and dirt. Then, the doors and drawer fronts will be sanded down and prepped for painting. The contractor will mask off areas that don’t need to be painted, such as the counters and floors. They will also use an industrial spray booth to prevent the spread of fumes throughout your home, and they will ensure that all surfaces are properly protected from paint splatters.
The refinishing process is labor-intensive, and it can take several days to complete. It is important to choose a company that is reliable and experienced, as this will ensure a quality finish and minimize disruptions to your daily routine. A reputable company will also have the proper equipment and tools to get the job done right. They will be able to handle the complexity of your project and will have the knowledge necessary to make recommendations on color, sheen level, and other finishing touches.
If your cabinets are looking drab, but they don’t have any structural problems or blemishes, refinishing may be the best option for you. However, if they have major damage or are worn out, it is probably better to replace them.
A professional can give you a wide range of color and finishing options, including matte, satin, and semi-gloss. You can even add a glaze or antiquing to your cabinets for an extra touch of style. In addition, they can recommend different stain colors and hardware options that will complement your new finish.
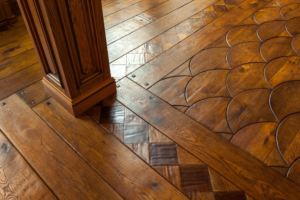
How to Refinish a Hardwood Floor
Hardwood Floor Refinishing NJ is a cost-effective way to make them look new again. This process involves sanding, staining, and sealing. It can take four to seven days for the process to be completed.
Begin by removing vent covers and quarter-round trim. Clean the floor and vacuum thoroughly. Then, buff the floor with a buffer and fine-grit sandpaper.
When refinishing hardwood floors, it is crucial to sand the surface of the wood properly. This step removes any old finish and scratches, allowing the new stain to adhere better. It also helps prevent splintering of the boards. A good quality drum sander or orbital sander is the best tool for this job, as it can be used by almost anyone with little experience. It is important to use a dust mask or respirator when sanding, as the fine dust can cause sinus problems and other health issues.
Initially, it is a good idea to start with a 40-grit belt on the sander and work up through the grits. This will remove most of the old finish and major scratches, leaving the floor ready for a new coat of finish. While sanding, it is important to switch out the sandpaper often and not overdo it with any one grit. This will keep the sanding process as quick as possible and ensure that you don’t ruin the hardwood by overdoing it.
After the sanding is done, it’s important to vacuum the floor and get all of the dust in the nooks and crannies of the room. This is especially important for areas around the baseboards, radiators and other hard-to-reach spots. You should also sand the edges of the floor to make sure that the new finish is even with the rest of the wood.
Once the floor is clean, it’s a good idea to open the windows to improve ventilation. It’s also a good idea to remove furniture, drapes and pictures from the room, as these can be damaged by the sanding dust. Finally, it’s a good idea to put plastic or painter’s tape on sensitive wall items like thermostats and wall unit air conditioners to protect them from the dust.
When applying the new topcoat, be sure to use a low-VOC product. These finishes are less likely to damage indoor air quality and require less time to dry than oil-based products. Once the final coat of finish has been applied, it’s a good idea to allow it to cure for a day or two before resuming regular use of the room.
There are a variety of colors and styles of stain that can be used on hardwood floors. It is a good idea to test a small area of the floor with the color and texture that you have in mind. This will help you get a feel for the finish before you apply it to the entire floor.
When it comes to staining, the most important thing is to make sure that the floor is properly sanded before proceeding. It is also important to follow the instructions on the product that you are using. The process can be quite messy, so it is a good idea to wear gloves and a mask. This will help to protect your skin and lungs from the dust that is generated during the staining process.
Once the stain is applied, it should be wiped down with a damp cloth. This will remove any excess stain and leave the floor looking smooth and even. It is also a good idea to allow the stain to dry completely before walking on it. It is recommended that you wait about 24 hours for the stain to completely dry.
It is also a good idea to use purified water during the staining process. This will ensure that the water doesn’t contain any contaminants that could interact with the stain and cause it to turn out blotchy. It is also important to stir the stain thoroughly. This will ensure that all of the pigment is evenly distributed throughout the container and that none of it will be lighter or darker than another part of the floor.
It is important to remember that a dark stain will show every scratch and blemish on the surface of the wood. This can be a disadvantage if you are trying to create a more elegant and sophisticated look for your home. Alternatively, you can opt for a clear coat of finish that will highlight the natural beauty of your floors without adding any color. This option can also be a great choice if you have pets that are prone to scratching and marking up your hardwood floors.
The final step in a quality hardwood floor refinish is to seal the new surface. This will protect the finish and prevent damage to the wood from water and stains. It is important to do this right, or the finish could peel or flake. There are several different types of sealers, and each has its own advantages and disadvantages. Some are natural, while others give a high-sheen appearance that is hard to beat.
It is important to make sure that the room is well-ventilated when you are sealing your hardwood floors, because many of them can emit harmful vapors. You also want to make sure that you are wearing the proper safety equipment, such as a respirator. You should also turn off the HVAC system and cover all vents to prevent dust from blowing throughout the house.
Before you begin sealing, you should vacuum the floor to remove all the sawdust and grit from the sanding process. You can also use a tack cloth to wipe the floor and remove any remaining dust. Then, you will need to vacuum the room again to get rid of any residual dust from the tack cloth.
You can choose from several different kinds of sealers, including shellac, polyurethane, and oil-based polyurethane. Shellac is an excellent choice for those who prefer a natural look to their hardwood floors, as it dries to a very smooth finish and does not emit a lot of fumes. However, it is not very durable and can be easily damaged by moisture.
Polyurethane is the most common topcoat for hardwood floors, and it comes in a variety of finishes from matte to glossy. It is easy to apply with a standard paintbrush, and it can be purchased in a wide range of colors. It provides the best protection for your hardwood floors, but it may need to be reapplied every six to 12 months.
If you prefer a more traditional look, you can use an oil-based polyurethane instead. This product is more expensive, but it offers a rich amber tint to your hardwood floors and will not yellow over time.
When it comes to hiring a contractor for your hardwood floors, it is important to choose one with a good reputation. You should be able to find online reviews, but you should also talk to friends and neighbors who have used the contractor. They can tell you if they were pleased with the quality of work and professionalism of the contractors. In addition, they can recommend other companies if they were dissatisfied.
While it is important to ask a potential contractor for references, you should not be afraid to ask for proof of insurance as well. This will help you protect yourself against any unforeseen accidents that may occur during the work process. Additionally, you should make sure that the company has liability insurance and that it is licensed.
Once you have chosen a contractor, it is important to discuss all the details of the job. This includes the cost, time frame, and what is included in the job. For example, you should be clear about whether the contractor will remove carpet and furniture from your home or if this will be a separate charge. It is also important to know how long the job will take so you can plan accordingly.
The last step in choosing a contractor is to look at their previous work. This can be done by looking at before and after photos or asking for a list of references. You should also ask about the different aspects of their job, such as dust control and how they handle baseboards. A reputable flooring contractor will be happy to provide you with these details.
Hardwood floor refinishing is an important investment in your home. It can enhance its value and improve your lifestyle. By following these tips, you can ensure that your wood floors are refinished correctly and look beautiful for years to come.
It is recommended that you refinish your hardwood floors every 8 to 12 years. However, sometimes a full refinish isn’t necessary. In these cases, a screen and recoat is a more cost-effective option. This will restore the protective polyurethane layer on your hardwood floors without sanding them.